- BizTalk Training 1 – Basic Send/Receive XML Message
- BizTalk Training 2 – Receive/Send Plain Text
- BizTalk Training 3 – Customize Filename Dynamically
- BizTalk Training 4 – Using Functiods in Map
- BizTalk Training 5 – Using FTP Adapter
Customize Filename Dynamically
This tutorial shows how to customize output filename inside orchestration.
There are 5 tutorials in this training.
- BizTalk Training 1 – basic send/receive xml message
- BizTalk Training 2 – receive/send plain text
- BizTalk Training 3 – customize filename dynamically
- BizTalk Training 4 – using Functiods in Map
- BizTalk Training 5 – using FTP Adapter
Objectives
- Learn how to change filename of the output file.
Prerequisites
- BizTalkTraining 2 project.
- Configuration on BizTalk Administration for BizTalkTraining application.
Topics
- Add variable in the orchestration.
- Add msgPerson2.
- Add Message Assignment to the orchestration.
- Test application.
Step-by-step
Suppose that I want to change name of outgoing file. As in training 2, the input filename is *.txt format but I want the outgoing message type as xml format and also add “output_” text before. E.g. incoming filename is “person1.txt”, outgoing filename will be “output_person1.xml”.
- Add variable in the orchestration.
- Open Orchestration1 in BizTalkTraining. (Project from BizTalk Training 2).

- Switch to Orchestration View, right click on Variables and select New Variable.

- Click on the variable.
- On Variable Property, change Identifier to “fileName”.
- Change Type to “string”.

- Now you’ve add variable name “fileName” as string to the Orchestration1.
- Open Orchestration1 in BizTalkTraining. (Project from BizTalk Training 2).
- Add msgPerson2.
- Create new Message on the orchestration name “msgPerson2” and set Message Type as the same as msgPerson (BizTalkTraining.FlatFilePersonSchema).

- Create new Message on the orchestration name “msgPerson2” and set Message Type as the same as msgPerson (BizTalkTraining.FlatFilePersonSchema).
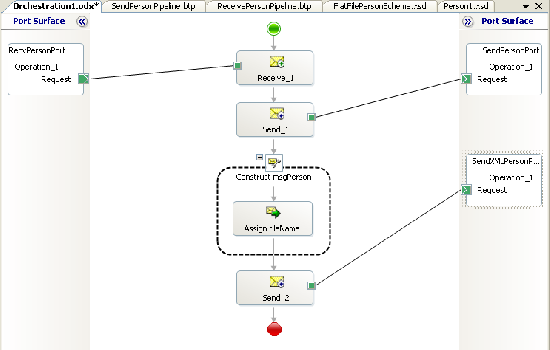
- Add Message Assignment to the orchestration.
- Drag Message Assignment from Toolbox to bottom of the Orchestration1.

- Click on ConstructMessage_1 object. Notice that you highlights entire Construct Message object.
- On Construct Message Properties, check msgPerson2 in Message Constructed and change Name to “Construct msgPerson2”.

- Click on Message Assignment (the object inside Construct Message) and change Name to “Assign fileName” in Message Assignment Properties.

- Double click on Message Assignment and fill in the code below and click OK.
msgPerson2 = msgPerson; fileName = msgPerson2(FILE.ReceivedFileName); fileName = System.IO.Path.GetFileName(fileName.Replace(".txt",".xml")); msgPerson2(FILE.ReceivedFileName) = "output_" + fileName;The code above assigns msgPerson to msgPerson2 and assigns incoming filename to “filename” variable, modify string and assign back to “msgPerson2”.

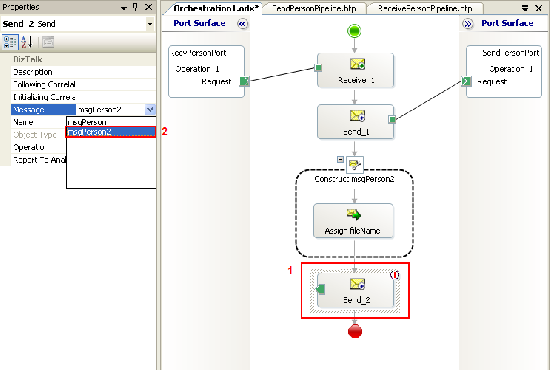
- Add new send component to the bottom of the orchestration and change Message to “msgPerson”.
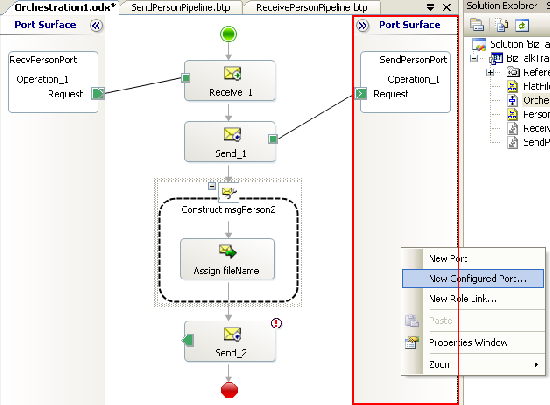
- Create new send logical port.
- Right click on Port Surface area, select New Configured Port.
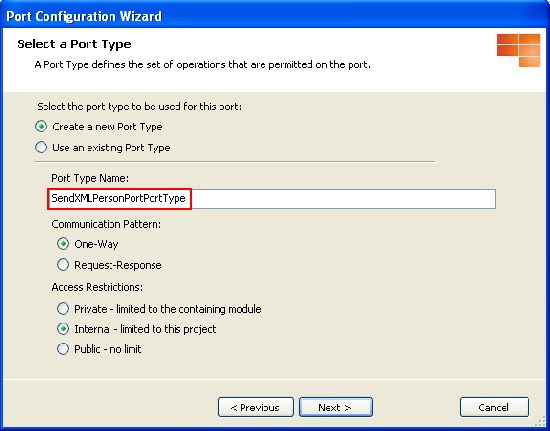
- Set name to “SendXMLPersonPort”.
- Set Port Type as following configurations.
Port Type: Create a new Port Type
Port Type Name: SendXMLPersonPortPortType
Communication Pattern: One-Way
Access Restrictions: Internal
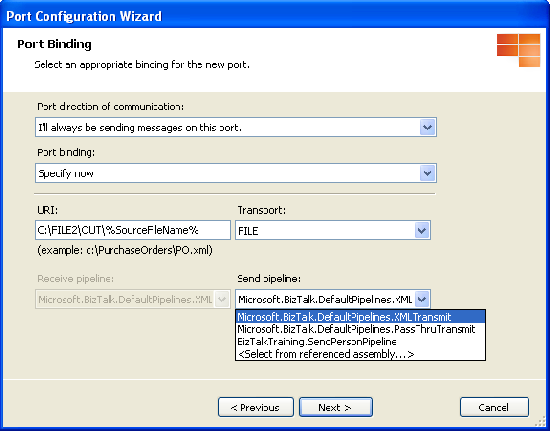
- Set Port Binding as below.
Port direction: I’ll always be sending messages on this port.
Port binding: Specify Now.
Transport: FILE
URI: C:\FILE2\OUT\%SourceFileName%
Send pipeline: XMLTransmit
- Right click on Port Surface area, select New Configured Port.
- Connect green button from Send component to SendXMLPersonPort.
- Deploy the project.

- Drag Message Assignment from Toolbox to bottom of the Orchestration1.
- Test the application.
Resources
You can download the example source code (zip file) at here.
The zip file contains
- BizTalkTraining folder which is the example project on Visual Studio 2005.
- FILE2 folder which contains IN and OUT empty sub folders for test receive and send message and person1.txt which is an example text message.
- binding.xml file which is a configuration file for import in BizTalk Administration.


So where’s the output_person1.txt file? I just see the person1.txt and person1.xml files.
It was my mistake. The output should be output_person1.xml not person1.xml. I’ll correct it soon.
Very nice! It helped me and also solved my problem too.
Thanks
Nice Article. Thanks a lot linglom!
Excellent article, exactly what I wanted.
I’ve tried out the example and the reason why the output filename is person1.xml and not output_person1.xml is because in the message assignment, “msgPerson2(FILE.ReceivedFileName);” will return you the full path and filename “C:\FILE2\OUT\person1.txt” and not just “person1.txt”, so when you append “output_” to the filename, you get “output_C:\FILE2\OUT\person1.xml”. The send port only uses what’s after the last “\”, so it still ends up as “person1.xml”. To correct this you should use
filename = System.IO.Path.GetFileName(filename.Replace(“.txt”,”.xml”));
filename = “output_” + filename;
instead of just
filename = filename.Replace(“.txt”,”.xml”);
filename = “output_” + filename;
This resolution came courtesy of Thiago Almeida,MVP. If you are interested in reading some of his articles, you can get to his site at “http://connectedthoughts.wordpress.com/”
Hi, Foon Lam
Thanks for correcting, it was my fault.
I have fixed it already.
Hi,
I guess this method works only when we use FILE adapter as the receive port. My question is how to name the file dynamically for WCF adapter receive ports?
Hope you can help me with this.
Thank you in advance.
I had run the solution but I am getting only .txt file and not the .xml file. I am not getting any error message. I guess the control is not moving after Send_1. please help.
Hi,
I am getting below error while assigning datatype of variable .
Attempted to read or write protected memory. This is often an indication that other memory is corrupt.