- BizTalk Training 1 – Basic Send/Receive XML Message
- BizTalk Training 2 – Receive/Send Plain Text
- BizTalk Training 3 – Customize Filename Dynamically
- BizTalk Training 4 – Using Functiods in Map
- BizTalk Training 5 – Using FTP Adapter
Using Functiods in Map
This topic will show how to use Functiods in BizTalk. Functiods are like functions, they are objects in Map Orchestration. The purpose of Map is to mapping values from source message to destination message. For instance, you can use concatenate functiod to concat two elements from source message and assign to destination message. There are 9 tutorials in this training.
- BizTalk Training 1 – basic send/receive xml message
- BizTalk Training 2 – receive/send plain text
- BizTalk Training 3 – customize filename dynamically
- BizTalk Training 4 – using Functiods in Map
- BizTalk Training 5 – using FTP Adapter
- Working on…
Objectives
- Learn how to use functiod to get current date time.
- Learn how to use functiod to concat two fields.
- Learn how to use functiod to add customize code.
Prerequisites
- BizTalkTraining 3 project.
- Configuration on BizTalk Administration for BizTalkTraining application.
Topics
- Create new person schema and message.
- Create simple map.
- Assign datetime functiod to map.
- Assign concatenate functiod to map.
- Assign scripting functiod to map.
- Modify the orchestration.
- Deploy the project and test result.
Step-by-step
- Create new person schema and message.
- Open BizTalkTraining project. And open Orchestration1.

- Add new schema to the project name as “NewPersonSchema.xsd”.

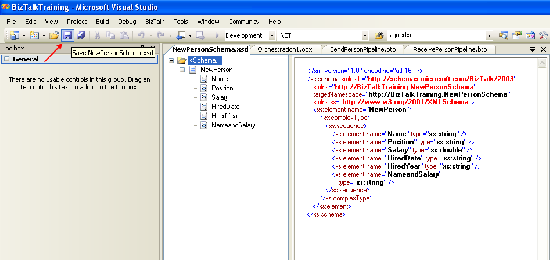
- Alter the new schema as the following detail:
Root name: NewPerson
Element: Name Type: String
Element: Position Type: String
Element: Salary Type: Double
Element: HiredDateTime Type: String
Element: HiredYear Type: String
Element: NameandSalary Type: String

- Click save button.
- Create new Message “msgNewPerson” and assign message type to be “NewPersonSchema.xsd”.

- Open BizTalkTraining project. And open Orchestration1.
- Create simple map.
- Add new Map item to Orchestration1 name as “MapNewPerson.btm”.

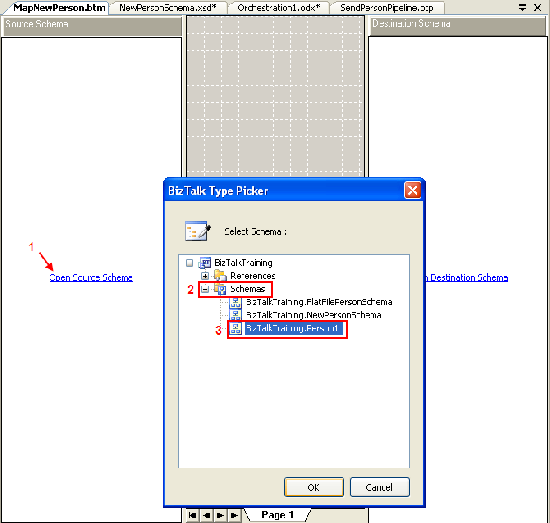
- New Map window appears, set source schema for mapping.
- Set destination schema for mapping. Select “BizTalkTraining.NewPersonSchema”.
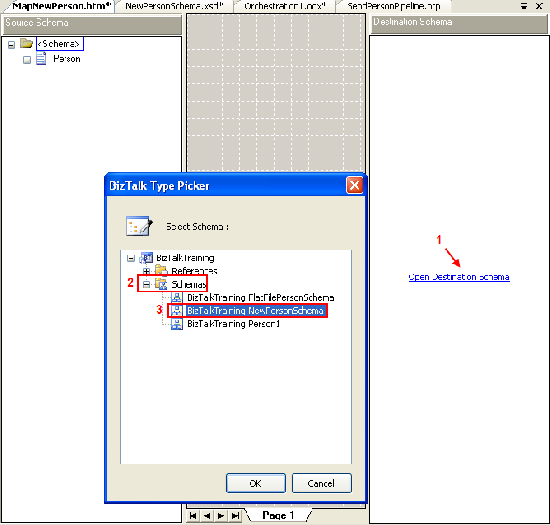
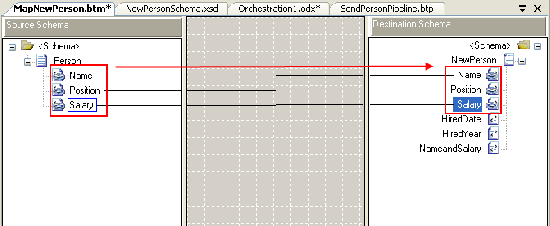
- Drag Name element in Source Schema to Name element in Destination Schema. Do these on Position and Salary elements, too.
Or you can click on Person root in Source Schema and hold shift button and drag to NewPerson root in Destination schema to get the same result.
- Add new Map item to Orchestration1 name as “MapNewPerson.btm”.
- Assign functiod datetime to map.
- On MapNewPerson map, you’ll see many functiods in Toolbox panel.
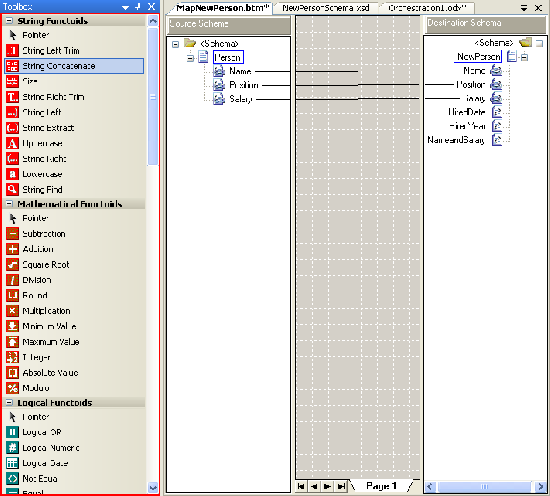
- Now I’ll use datetime functiod to generate current date and time to HiredDate element on Destination Schema.
- Scroll down to Date/Time Functiods, select Date and Time. Drag it to map between the Source Schema and Destination Schema area.
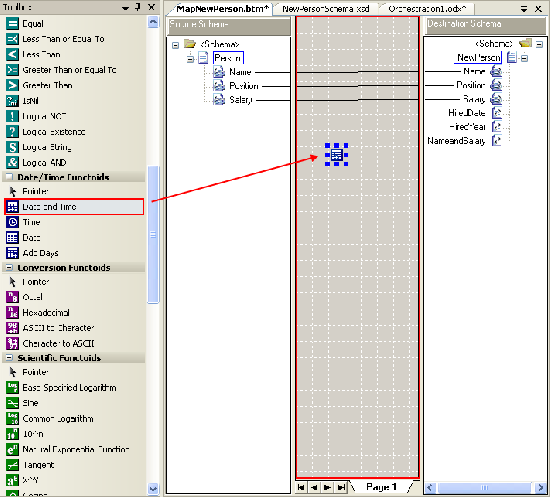
- Double click on the functiod Date and Time, you’ll see Configure Functiod Inputs window. Fuctiod Data and Time doesn’t get any input, it’ll will generate current date and time in CCYY-MM-DDThh:mm:ss format.

- Drag the functiod to HiredDate on Destination Schema to generate current date and time to HiredDate element.

- On MapNewPerson map, you’ll see many functiods in Toolbox panel.
- Assign concatenate functiod to map.
- Now I’ll concatenate Name and Salary element in Source to NameandSalary in Destination.
- On MapNewPerson map, drag String Concatenate functiod to map area.
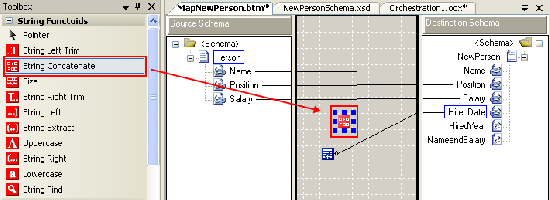
- Drag Name and Salary element on Source Schema to concatenate functiod and drag concatenate functiod to NameandSalary element on Destination Schema.
Notice that the inputs will be on left side of the functiod and output will be on right side.
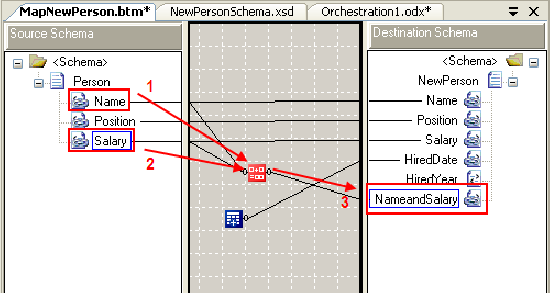
- Assign scripting functiod to map.
- Scripting functiod allow you to customize your code. Now I want only year from datetime functiod to HiredYear element on Destination Schema.
- Again, drag Scripting functiod in Advanced functiods to map area.
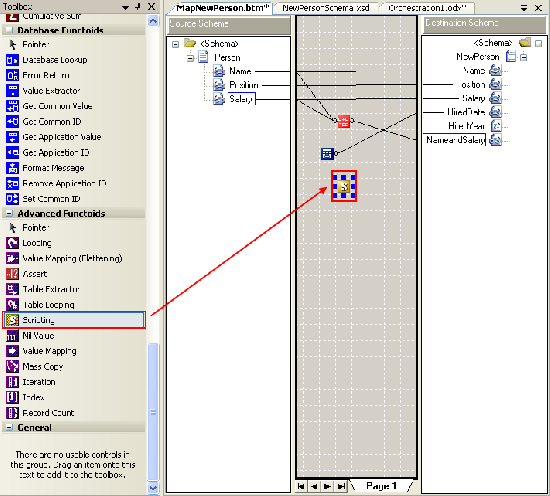
- Click on Scripting functiod. On Properties, click on the rightmost button in Script to configure script.
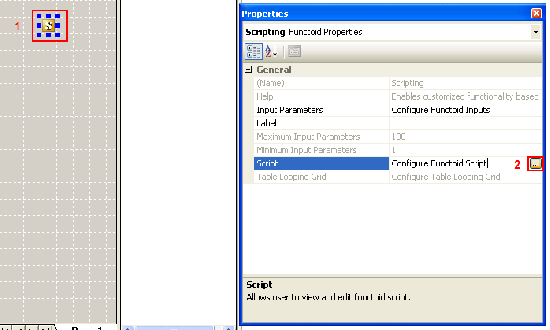
- Configure Functiod Script window appear, click on drop-down in Script type and you’ll see that there are many type of script you can use but now I’ll use Inline Visual Basic.NET.

- Notice that when you click on Inline Visual Basic.NET, the comment code appear below in Inline script buffer. This is a simple script that does the concatenation of 2 inputs.

- Replace all the code with the code below.
Public Function GetYear(ByVal datetime As String) As String
Return datetime.SubString(0,4)
End Function

- Drag the datetime functiod to the scripting functiod and also drag the scripting functiod to HiredYear element on Destination Schema.

- Note that if you want one functiod to be input of another you must place it on left side on the functiod. For instance, you can’t place datetime functiod on the red area in the figure below if you want it to be input of the scripting functiod.
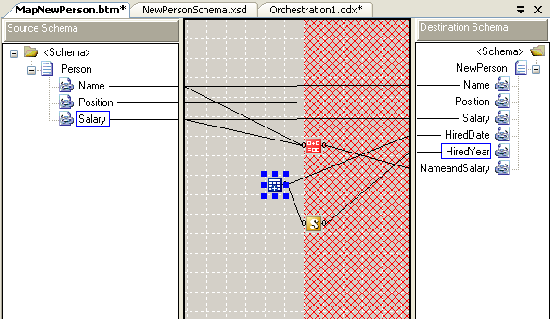
- Save MapNewPerson map.
- Modify the orchestration.
- Create transform object.
- Drag Transform from Toolbox in “Construct msgPerson2” upper the “Assign filename” Message Assignment.
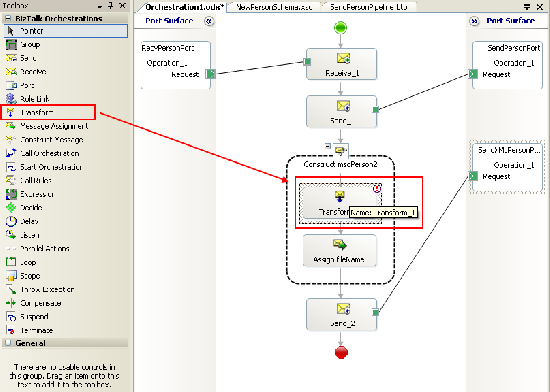
- Double click the transform object that you’ve just added. Transform Configuration window appears, select Existing Map and on Fully Qualified Map Name drop-down to select “BizTalkTraining.MapNewPerson”.

- On Source, select “msgPerson”.

- On Destination, select “msgNewPerson”.

- Click on Source again to refresh the Destination and click OK.
- Drag Transform from Toolbox in “Construct msgPerson2” upper the “Assign filename” Message Assignment.
- Change Construct Message Properties and “Assign fileName” Message Assignment.
- Click on “Construct msgPerson2” Construct Message. On properties, uncheck the msgPerson2 out from Message Constructed since we don’t need msgPerson2 any more. And ensure that “msgNewPerson” is checked instead. Also, change Name to “Construct msgNewPerson”.
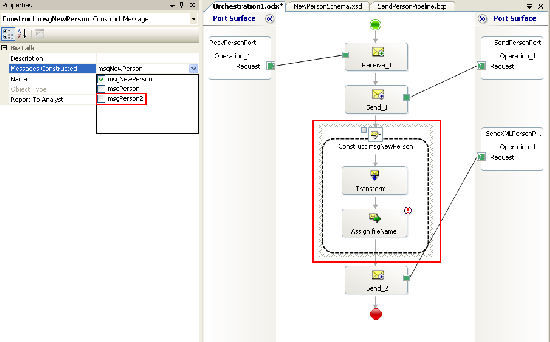
- Double click on “Assign fileName” Message Assignment to alter the code. Replace the entire code with code below.
fileName = msgPerson(FILE.ReceivedFileName);
fileName = fileName.Replace(“.txt”,”.xml”);msgNewPerson(FILE.ReceivedFileName) = “output_” + fileName;

- Click on “Construct msgPerson2” Construct Message. On properties, uncheck the msgPerson2 out from Message Constructed since we don’t need msgPerson2 any more. And ensure that “msgNewPerson” is checked instead. Also, change Name to “Construct msgNewPerson”.
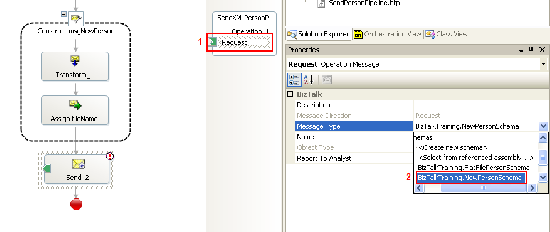
- Change message on Send_2 Port to “msgNewPerson”.
- Break the green line between Send_2 and Send XMLPersonPort.
- On Send_2 properties, change Message to msgNewPerson.

- Change message type on send logical port.
- Reconnect the green line between Send_2 and SendXMLPersonPort.
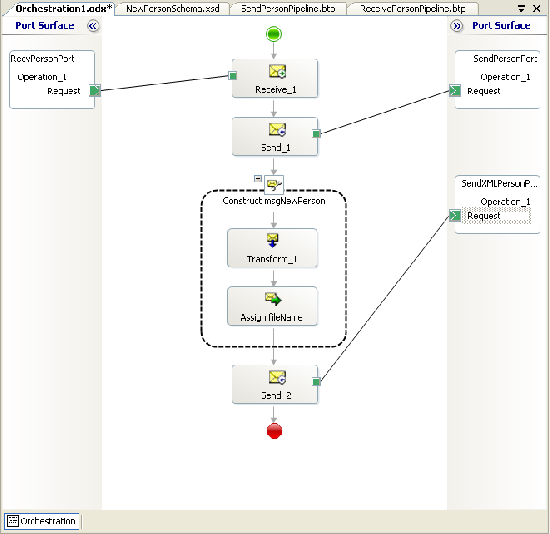
- Create transform object.
- Deploy the project and test result.
- Deploy the project

- Open BizTalk Administration, restart the server host if it is running and refresh the application.
- Test the result by copy person1.txt from C:\FILE2 to C:\FILE2\IN, you’ll see the result in C:\FILE2\OUT\person.xml
Person1.xml

Note: Again, ensure that you delete all files in C:\FILE2\OUT before.
- Deploy the project
Resources
You can download the example source code (zip file) at here.
The zip file contains
- BizTalkTraining folder which is the example project on Visual Studio 2005.
- FILE2 folder which contains IN and OUT empty sub folders for test receive and send message and person1.txt which is an example text message.
- binding.xml file which is a configuration file for import in BizTalk Administration.
