- Accessing MySQL on VB.NET using MySQL Connector/Net, Part 1: Introduction
- Accessing MySQL on VB.NET using MySQL Connector/Net, Part 2: Setup MySQL Server
- Accessing MySQL on VB.NET using MySQL Connector/Net, Part 3: Install Sample Database
- Accessing MySQL on VB.NET using MySQL Connector/Net, Part 4: Create & Grant MySQL User Account
- Accessing MySQL on VB.NET using MySQL Connector/Net, Part 5: Install MySQL Connector Net
- Accessing MySQL on VB.NET using MySQL Connector/Net, Part 6: Create Connection
- Accessing MySQL on VB.NET using MySQL Connector/Net, Part 7: Perform SQL Operations
- Accessing MySQL on VB.NET using MySQL Connector/Net, Part 8: Display Result on GUI
You can download example databases for MySQL at http://dev.mysql.com/doc (Scroll down to Example Databases section). By the time I’m writing the article, there are 4 sample databases available on the page. I choose the world database since it compatible with all MySQL version.
Step-by-step to install sample database
- Download the sample database “world database”. Extract it, you’ll get the world.sql file to the Database PC. This file will be imported to MySQL in few steps later.

- On the database PC, open command-line mode. Type below command to connect to the MySQL Server using MySQL’s root account.
mysql -u root -p
The parameter -p makes MySQL ask you to enter the password. Then, type the root’s password. In this example, it is “password”.
Note: You can type this command on any path because I have added MySQL path to system environment while I was configuring MySQL Server on the previous part.

- Now I have connected to the MySQL Server. Next, I’m going to create an empty database name “world”.
CREATE DATABASE world;
Then, change the default database to the created database.
USE world;
- Next, load the contents of “world.sql” file into the world database. The “world.sql” file was created on the first step.
SOURCE c:world.sql
You have to alter the path to where the world.sql file is located.

- You’ll see lot of output that MySQL performs query from the world.sql file.

- After MySQL finishes processing the world.sql file, try to test if the query is executed successfully. Type the command below to list all tables on the current database.
SHOW TABLES;
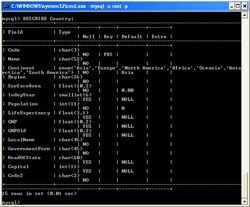
- You also can see the columns on the table by type the below command.
DESCRIBE Country;
- If you see the columns and tables as previous steps, it means that you have install sample database successfully.
Reference
- Setting Up the world Database – MySQL.com.


good tutorials
thanks