- Getting started with Microsoft ISA Server 2006, Part 1: Introduction
- Getting started with Microsoft ISA Server 2006, Part 2: Environment Setup
- Getting started with Microsoft ISA Server 2006, Part 3: Installation
- Getting started with Microsoft ISA Server 2006, Part 4: Service Pack 1
- Getting started with Microsoft ISA Server 2006, Part 5: Network Layout Concept
- Getting started with Microsoft ISA Server 2006, Part 6: Configure Network Layout
- Getting started with Microsoft ISA Server 2006, Part 7: Create DNS Lookup Rule
- Getting started with Microsoft ISA Server 2006, Part 8: Create Web Access Rule
- Getting started with Microsoft ISA Server 2006, Part 9: Client Configuration
- Getting started with Microsoft ISA Server 2006, Part 10: Logging
- Getting started with Microsoft ISA Server 2006, Part 11: HTTP Filtering
- Getting started with Microsoft ISA Server 2006, Part 12: Block Windows Live Messenger
Configure Network Layout
From Part 5: Network Layout Concept, you learn about network templates. On this post, I will show how to configure networking environment of the ISA Server 2006 using edge firewall template which is the most suitable template for this example. You can see the network diagram of the example on Part 2: Environment Setup.
Step-by-step
- Open ISA Server Management by click Start -> Programs -> Microsoft ISA Server -> ISA Server Management.

- On Microsoft Internet Security and Acceleration Server 2006, expand Arrays -> BKKISA001 -> Configuration -> Networks.

- Select Templates tab and click on the Edge Firewall template.

- A Network Template Wizard window appears, click Next to continue.

- On Export the ISA Server Configuration, you can click on Export button to backup your current ISA Server configuration. But this is the first time configuration so there is no need to backup anything.

- On Internal Network IP Addresses, verify if the IP address ranges are correct. My internal network is 192.168.10.0/24 so the existing range is correct. Click Next.

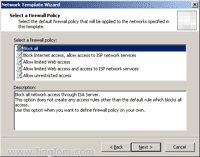
- On Select a Firewall Policy, you can choose a pre-defined firewall policy which will be applied to the network specified in this template. On this example, I select Block all. I will create firewall rules manually on the next part.
Note: On edge firewall template, there are five predefined firewall policies which are:- Block all
Block all network access through ISA Server. This option does not create any access rules other than the default rule which blocks all access.
Use this option when you want to define firewall policy on your own. - Block Internet access, allow access to ISP network services
Block all network access through ISA Server, except for access to network services, such as DNS. This option is useful when these services are provided by your Internet Service Provider (ISP).
Use this option when you want to define firewall policy on your own.The following access rules will be created:
- Allow DNS from Internal Network and VPN Clients Network to External Network (Internet).
- Allow limited Web access
Allow Web access using HTTP, HTTPS, FTP, only. Block all other network access.The following access rules will be created:
- Allow HTTP, HTTPS, FTP from Internal Network to External Network.
- Allow all protocols from VPN Clients Network to Internal Network.
- Allow limited Web access and access to ISP network services.
Allow limited Web access using HTTP, HTTPS, and FTP, and allows access to ISP network services, such as DNS. Block all other network access.
The following access rules will be created:- Allow HTTP, HTTPS, FTP from Internal Network and VPN Clients Network to External Network (Internet).
- Allow DNS from Internal Network and VPN Clients Network to External Network (Internet).
- Allow all protocols from VPN Clients Network to Internal Network.
- Allow unrestricted access
Allow unrestricted access to the Internet through ISA Server. ISA Server will prevent access from the Internet.The following access rules will be created:
- Allow all protocols from Internal Network and VPN Clients Network to External Network (Internet).
- Allow all protocols from VPN Clients Network to Internal Network.
- Block all
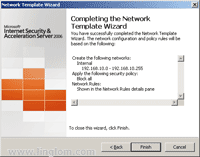
- On Completing the Network Template Wizard, click Finish.

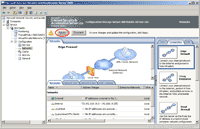
- Then, you notice that there is a warning icon at the top of ISA Server Management. This means that the changes which you have made do not take effect yet. To update the configuration, click Apply.
Note: If you want to undo changes that you have made, click Undo.

- The changes have been saved.

What’s Next
You have configure networking environment for the ISA Server 2006. Next, let’s see how to create some access rules on ISA Server 2006.
