- Change MAC Address in Windows, Part 1: Introduction
- Change MAC Address in Windows, Part 2: Feature on NIC
- Change MAC Address in Windows, Part 3: Windows Registry
This post shows how to change MAC Address in Windows. It requires that the Network Interface Card (NIC) supports virtual MAC Address feature. Most of NICs nowadays should has this feature. You can check if your NIC supports this feature by follow the step-by-step section until step 5.
Note: This method doesn’t change the burned-in (physical) MAC Address on a NIC.If you can’t change MAC Address by this method, you still has another method which requires you to change values on Windows registry or using the tool such as SMAC tool to change MAC Address.
Note2: Changing MAC Address in Windows by this method is not supported by Microsoft. I’ll not be responsible on any damage or loss on your system. Do on your own risk!
Step-by-step to change MAC Address using feature on NIC
- Before start, I’ll show the current MAC Address. It is 0021.8508.4565.

- Open Control Panel. Click Start -> Settings -> Control Panel.

- Open Network Connection Properties. Right-click on the network connection that you want to change MAC Address and select Properties.

- On the Connection Properties, click Configure.

- On Network Connection Properties, select Advanced tab -> select Locally Administrated Address or Network Address -> enter the MAC Address value that you want in the value box (without dot(.) or dash(-) between the MAC Address numbers). In this example, I’ll set to “000C29530036”. Then, click OK.
Note: If you can’t find Locally Administrated Address or Network Address property, it means that the NIC doesn’t support virtual MAC Address feature so you can’t change MAC Address by this method.

- The network connection will be restarted.

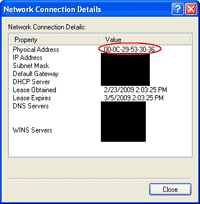
- After that, observe the MAC Address of the network connection again. You’ll see that the MAC Address value has been changed to the value that I’ve just entered (00-0C-29-53-00-36).

- To change the MAC Address value back to the original (the built-in value), just select Not Present or Use Default or delete out the configured MAC Address value on step 5 depends on which NIC you’re using.
1st off THIS DOES NOT WORK! While you are correct that you “technically” changed the Mac Address (by inputting different values a quick trip to the command prompt will show you nothing has in fact changed.
2nd, there is NO WAY of changing the original Mac Address PERIOD. How do I know this? Here’s how:
-Type CMD and right click to run it as an admin
-Next, type arp -a …and hit enter.
See that? Exactly.
The Mac Address you thought you had changed did NOT change. This means the assigned IP will always KNOW your hardware encoded original Mac Address….
Prove me wrong.