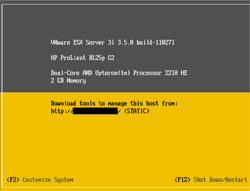
By default, SSH is disabled on VMWare ESXi Server but you can enable SSH manually. It’s easy, just take a few minutes and few steps to enable SSH. On this example, I am going to show how to enable SSH on VMWare ESXi Server 3.5 on HP ProLiant BL25p G2.
Step-by-step to enable SSH on VMWare ESXi server 3.5
- On VMWare ESXi Server, press “ALT+F1” to access VMWare ESXi console.

- By default, VMWare ESXi is disabled console access. So you have to enable it by type the following text and press Enter.
unsupported
Note: You won’t see the text that you have typed on this step.

- If you type the text correctly, there’ll be a message tells that
You have activated Tech Support Mode.
The time and date of this activation have been sent to the system logs.
Then, it asks for the root’s password so type the password of the root account and press Enter.
Note: You also won’t see the text that you have typed on this step either.

- Now you have accessed to console on VMWare ESXi. Notice that you see “~ #” at the beginning which means that the console is waiting for a command from you.

- To enable SSH, you have to edit /etc/inetd.conf. Type the command below in the console.
vi /etc/inetd.conf
Note: vi is the file editor tool in Linux platform as similar to Notepad in Windows.

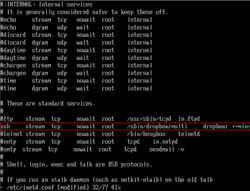
- Here, you see the content of inetd.conf.

- Scroll down to the line that begins with the following text.
#ssh stream tcp nowait root /sbin/dropbearmulti dropbear
Then, press the character ‘x’ when the cursor is on the character ‘#’ to remove ‘#’ as the figure below.
ssh stream tcp nowait root /sbin/dropbearmulti dropbear
Note: The character ‘#’ at the beginning on a line means that the line is a comment, the program that associated with the file will not process the line.

- Next, save the file by press ESC. Then, type
:wq!
and press Enter to save and exit the file editor at the same time.

- Next, restart the management service. Type
/sbin/services.sh restart
Note: Since VMWare ESXi 3.5 Update 2, the “/sbin/services.sh restart” command is no longer restarts the inetd process so the configuration that you’ve just modified is not reflect to the system yet. Therfore, you need to do more steps.

- Next, you need to kill the inetd process. First, you have to get the process id of inetd. Type the command below, you’ll see the process ID of inetd.
ps | grep inetd
- Kill the process. Type the command “kill -HUP” follow with the process ID that you get from the previous step as the figure below.
kill -HUP 1288
Note: The process ID of inetd of yours may not be the same as mine. You have to adjust by yourself.

- That’s it. You have enabled SSH on VMWare ESXi Server already. Now you can SSH to the VMWare ESXi Server using tool such as putty, WinSCP, etc. Type the command below to exit the console.
exit
- Then, press “Alt+F2” to return to the GUI screen.
